


 You’ve booked the interview, cleared the conference room, and now you’re staring at fluorescent lights, wondering how to make this look professional.
The reality is that office spaces weren’t designed for filming. And most companies don’t have a film studio tucked away near the printer room.
But you can set up a decent interview space in almost any office without hiring a grip truck or spending thousands on gear.
Our team at Grizzly Bear Media has filmed in boardrooms, open-plan offices, and even that one cramped meeting room with the weird echo. Through our practical experience setting up hundreds of office interviews, we’ve learned what works (and what’s just expensive overkill).
In this guide, we’ll walk you through:
- Choosing the right room and testing acoustics before you film
- Lavalier mic setup for clean, professional audio
- Three-point lighting that separates your subject from the background
- How to match colour temperatures
Let’s get your office interview-ready.
Planning Your Shoot: Location and Acoustic Checks
The best interview footage starts before you even power on the camera. You need to scout your location and test the acoustics first.

The problem is that office buildings come with their own set of challenges for video interviews (like that constant hum from the air conditioning). The reason you want to sort these issues out early is that fixing bad sound later costs more time and money than getting it right up front.
Here’s how to set up your office space for clean audio and professional-looking video interviews.
Selecting the Ideal Office Space for Camera Angles
The first step in any office shoot is finding the best location for your camera setup. Your camera needs enough space to frame the person properly, and the background counts just as much as the subject.
So look for rooms with some depth so you can position the subject away from the wall. This separation gives you room to add a hair light and prevents harsh shadows from appearing directly behind the person’s head.
Useful Tip: Find rooms with windows you can control, as they give you flexibility with natural light. Though natural light works beautifully for interviews, you need to avoid backlighting (where the window is behind your subject).
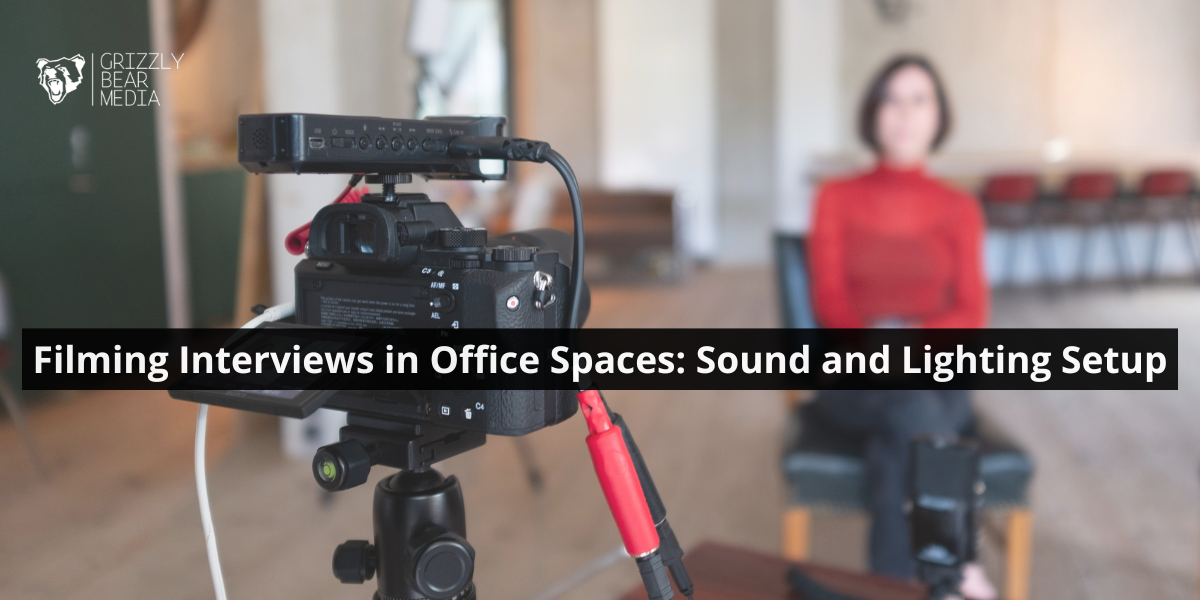
Achieving Professional Audio with a Lavalier Microphone
A lavalier microphone (also called a lapel mic) is a small clip-on microphone that attaches to your clothing, usually on the collar or shirt. These mics capture clear voice audio while staying out of the camera frame.
Once you clip them on, they stay a consistent distance from the person’s mouth, which means your sound levels stay steady throughout the recording.
When you’re setting up your lavalier microphone position, placement affects both voice clarity and how natural the audio sounds. Here’s what works best:
- Use a foam cover on the mic to soften breath sounds.
- Make sure the wireless transmitter and receiver are close to prevent audio dropouts.
Also, run the lapel mic cable under the person’s shirt if possible. This keeps it hidden and prevents the cable from rubbing against clothing. (Nobody wants to hear someone’s shirt having a conversation with the microphone.)
Once you’ve sorted out your location and audio setup, the next piece is getting your lighting right.
Interview Lighting: The Three-Point Setup
What separates a basic recording from a professional video interview? If we answer in one word, it’s “lighting”.
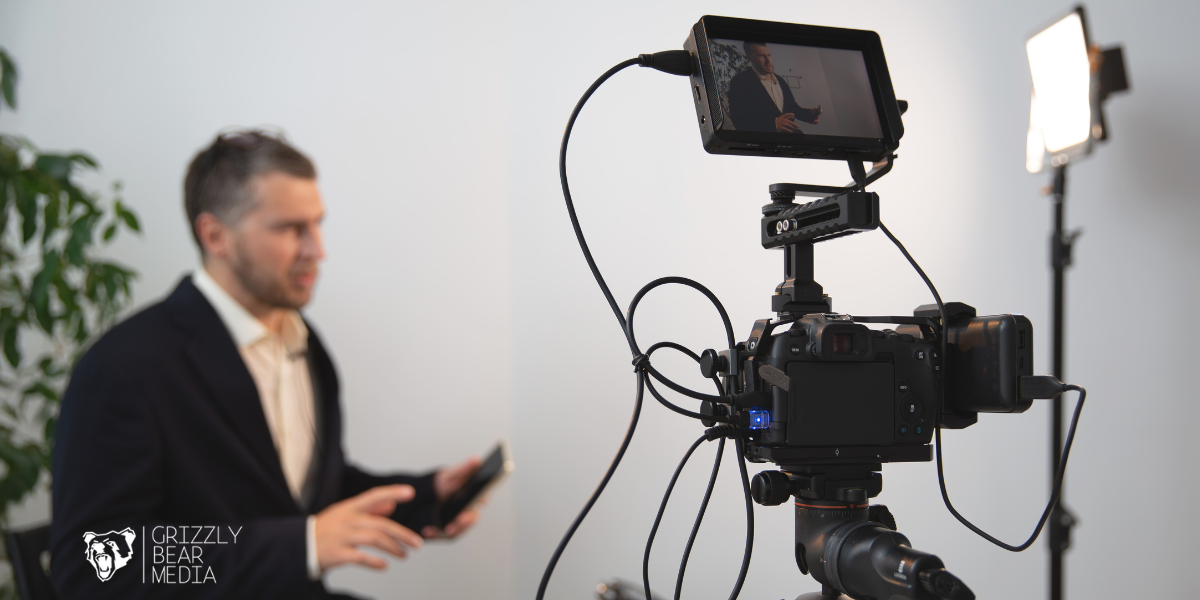
The difference between a simple recording and a professional video is often just three lights (key light, fill light, and hair light) and the right setup.
Usually, office spaces have overhead fluorescent lights that cast unflattering shadows and make people look washed out on camera. But with three-point lighting, you can control how your subject appears on screen and create depth that makes them stand out.
Let’s walk through how to set up each light for the best results.
Setting Up the Key Light and Fill Light
For setting up your interview, you want to create a flattering, dimensional look on your subject using the interplay of key light and fill light. When you balance this combination, you define the face and control how dramatic or soft your interview appears.
Here’s how to position each light:
- Position your key light correctly: Put the key light at a 45-degree angle from the camera, slightly up, to make a nice shadow on one side of the face.
- Balance with fill light: If you want to soften those shadows, set the fill light opposite the key light at a lower power to remove those harsh shadows.
Also, if you’re shooting in a small space where a second light won’t fit, you can use a reflector to bounce the key light back. That solution works best and costs less than buying another light.
Adding Separation with the Hair Light and Backlight
After your key and fill lights are in place, the next step is using a third light to ensure the person is not lost in the background.
Though the key light handles the face, the hair light adds that professional quality that makes your video look finished instead of amateur. This hair light (sometimes called a backlight) sits behind and above your subject, pointing down at the top of their head and shoulders.
The result creates a subtle rim that separates the person from whatever is behind them in the frame.
We suggest keeping your hair light at about half the power of your key light and adjusting based on the person’s hair colour and the background brightness.
Matching Light Colour Temperature with Ambient Office Light
All lights have a colour temperature measured in Kelvin. Typically, office fluorescent lights sit around 4000-5000K (cool white), while tungsten bulbs are around 3200K (warm orange).
If your camera’s white balance is set for one temperature but your lights are another, skin tones will look off. That’s why you need to set all your lights to the same colour temperature and match your camera’s white balance to that setting.
One of our clients shared a story about filming an interview where half the subject’s face looked blue and the other half looked orange. The problem was mixing daylight from a window (5600K) with their tungsten key light (3200K).
But after we closed the blinds and switched everything to 3200K, the footage looked natural again.
Now that your lighting is sorted, it’s time to run through your final checks before you roll the camera.
Essential Gear and Final Setup Checks
You’ve set your lights and positioned your microphone, but the shoot isn’t ready until you verify everything works together. So run some final checks to catch problems before you waste your and your subject’s time on a recording that doesn’t work.
Here’s how to make sure your equipment is ready to go:
Connecting the Recording Device and Monitoring Audio Levels
Proper connection of the recording device ensures the lavalier’s high-quality audio gets saved the right way. Plus, monitoring your levels during the shoot helps you catch any audio drops before they ruin your footage.
These steps will help you connect and test your audio:
- Connect your audio equipment properly: Plug the lavalier receiver into the recording device or camera with the correct cables. Usually, a 3.5mm TRS cable for cameras or an XLR cable for professional audio recorders will do the job.
- Set your recording levels: If you’re using a camera with manual audio controls, set the audio level high enough on the recording device. In this case, have your subject speak normally and check that the meter stays green without turning red.
Useful tip: Listen with headphones for any unwanted noise, lapel rustling, or wireless interference. You can’t fix these problems in post-production, so catch them now while you still have time to adjust the mic placement or switch channels.
Quick Checklist for Lighting and Sound
Before the interview begins, you need to run a final check on all light and sound settings to avoid technical problems mid-shoot.
Here’s what to verify before you hit record:
- Visually confirm the light’s softness and that shadows are balanced on the face.
- Check whether the hair light outlines the background clearly.
- Ensure all cables are completely hidden so the final video frame looks clean.
When everything passes your checklist, do a ten-second test recording and play it back.
Even experienced crews forget to press record sometimes (and discovering that mistake after the interview wraps never gets less painful).
Get Your Office Interview Setup Right the First Time
Office interview setups feel complicated at first, due to echo from glass walls, buzzing HVAC systems, and harsh fluorescent lighting that washes out faces. But the problems you face have easy fixes that don’t require expensive studios or weeks of training to learn.
We’ve walked you through room selection, lavalier mic positioning, and three-point lighting for professional-looking interviews. Also, you’ve learned how to match colour temperatures and run final checks before recording.
Now you know how to set up office interviews that capture clean audio and flattering video.
When you’re ready to film interviews that look and sound professional, we’ll be happy to help you get there.